Shared State and Authentication with React's useContext
Authentication is an important part of most web apps, especially in the assignment. The issue is when you need to share state-in this case, an auth token from the server-between many components. You definitely don't want to be in prop hell, sharing one state variable with all your components and children.
React thankfully provides a neat way to manage state in a scalable way, including application-wide state like auth tokens. While there are other state management libraries like MobX, Redux or Recoil, this blog post will outline how to use React's useContext hook to create a simple authentication system.
What You'll Need
- A basic understanding of React
- Basic knowledge of React Router (a few tutorial videos on this)
Example App
Here's an example app to give you a live demonstration of how the authentication system works.
High-level
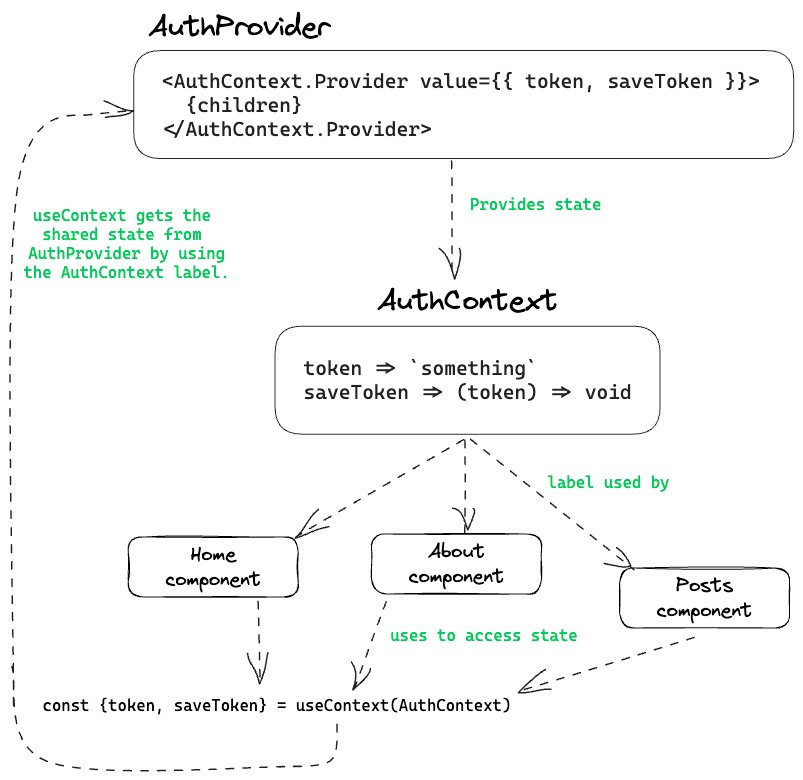
In React, useContext is a hook that provides a clean way to access the value of a context from any component in the tree—not just those that are direct children of the context provider. This proves especially useful for handling "global" data like auth data. The following diagram provides a high-level overview of the useContext architecture and how its used within the app seen above.
Code Walkthrough
1. Create an Auth Context - AuthContext.js
Firstly create an AuthContext, and make sure to supply the context with the default values.
export const AuthContext = createContext({
  token: undefined,
  setToken: () => {},
});
1. Create the Auth Provider - AuthProvider.js
The AuthProvider component will make use of React's useState to manage the token, providing it to the AuthContext.Provider.
export function AuthProvider({ children }) {
  const [token, setToken] = useState(null);

  const saveToken = (serverToken) => {
    setToken(serverToken);
  };

  return (
    <AuthContext.Provider value={{ token, saveToken }}>
      {children}
    </AuthContext.Provider>
  );
}
3. Wrap app with Provider in index.js
Then wrap your entire application within the AuthProvider.
const router = createBrowserRouter(
  createRoutesFromElements(
    <Route path="/" element={<Root />}>
      <Route index element={<Home />} />
      <Route path="about" element={<About />} />
      <Route path="posts" element={<Posts />} />
      {/* ... etc. */}
    </Route>
  )
);

const root = ReactDOM.createRoot(document.getElementById("root"));
root.render(
  <AuthProvider>
    <RouterProvider router={router} />
  </AuthProvider>
);
4. Create the Login Page - Home.js
On the login page, we'll use useContext to access the saveToken function, here the useContext will look for the nearest provider (i.e. AuthProvider) and use the label AuthContext to find the relevant state variables and or functions attached to that context. Here we fetch the saveToken function that sets the state of token.
const { saveToken } = useContext(AuthContext);
const handleLogin = () => {
    // req login to server get back a token
    if (email === "1" && password === "1") {
      saveToken("thisisafaketoken");
    } else {
      alert("Invalid email or password");
    }
};
5. Create a Page that Requires Authentication - Posts.jsx
Similarly to step 4, we fetch from the AuthProvider using the AuthContext label, this time we fetch the token. We then use this token as means to determine what we show to the user as seen below.
Note: we could also redirect the user to a new page if the token was undefined.
  const { token } = useContext(AuthContext);
  return (
    <div>
      {token ? "This is the Posts page!" : "Unluggy you cannot see this"}
    </div>
  );
To Conclude
Using React's useContext, we created a flexible authentication system. It can be easily extended for token fetching from an API.
Pro Tip: To make the token persist across browser refreshes, consider using localStorage along with React's useEffect within the AuthProvider.
Pro Tip v2: check out Soorria's useLocalStorage hook for this. It handles state synchronisation and more.